
Embark on an Epic Adventure in Lost Lands 9
Lost Lands 9 continues the captivating saga of Folnur and Maaron as they defend their homeland against a mysterious and formidable evil. Packed with intricate puzzles and engaging quests, this chapter challenges players to use their wit and resourcefulness. To assist you in conquering each chapter, this comprehensive walkthrough provides detailed solutions and strategies to navigate through the game’s numerous challenges.
Chapter 1: Unchildlike Mischief
Begin your journey by exploring the initial scene, where you will need to collect key items and interact with your surroundings to progress.
- Take the iron flower from the trough.
- Retrieve the stick from the signpost.
- Use the stick to hit the beehive, causing a distraction.
- Collect the screwdriver piece from the signpost.
- Place the iron flower into the obelisk to activate it.
- Proceed right along the road to the next area.
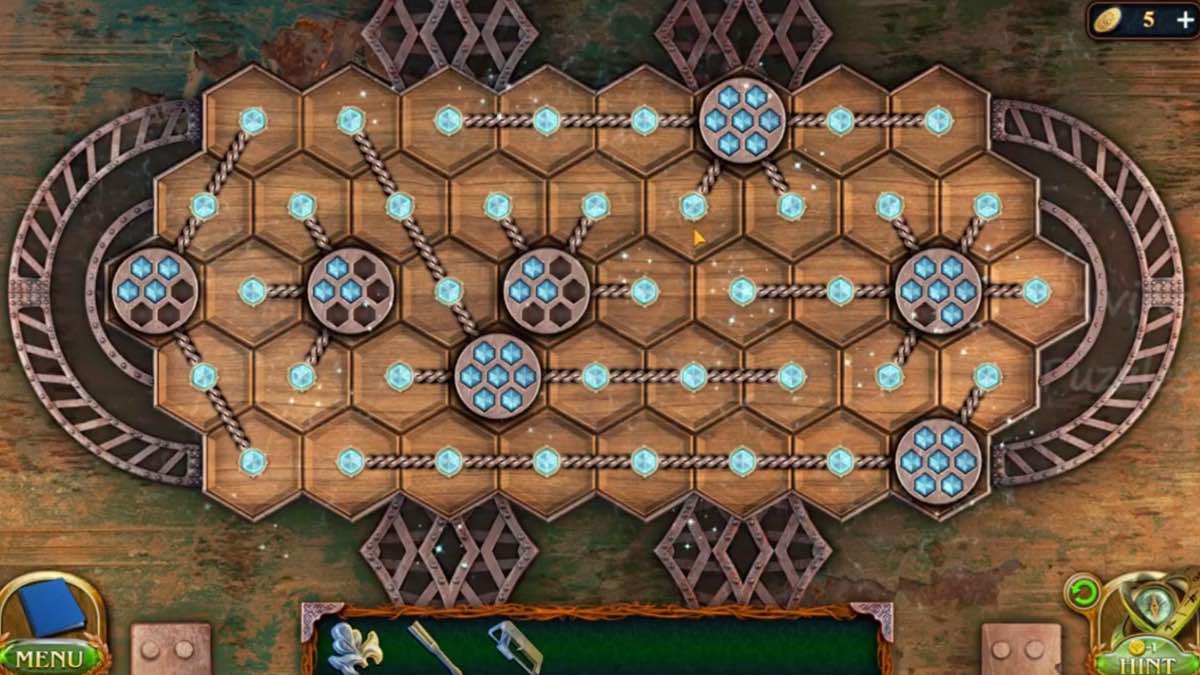
In this chapter, you’ll encounter the Honeycomb Puzzle, which involves filling honeycombs with threads to unlock further items. Carefully follow the steps to fill all honeycombs and retrieve the rope and key.
Honeycomb Puzzle Solution
- Tie the rope to the tree.
- Attach the ascender to the rope.
- Use the ascender to descend into the canyon safely.
Chapter 2: Academic Interest
This chapter takes you through a series of puzzles involving symbols, codes, and hidden objects within the library and surrounding areas.
Key Puzzles and Solutions
- Use the note to decipher the glyph puzzle, matching glyphs with the ones on the note. The solution involves rotating each tile until the lines glow, with no fixed pattern due to randomness.
- Solve the Rainbow Circle Puzzle by rotating the circle to match patterns, guided by colors and symbols.
- Complete the Crystal Star Puzzle by matching colored tiles with their respective patterns, which is randomized for each player.
- Interact with various objects such as the skeleton, note, and statues to gather clues needed for progressing in the chapter.
Additional Challenges
- The Sarcophagus Glyph Puzzle requires selecting glyphs in a specific order based on clues from the wall behind the boards.
- Recreate the glyph pattern by rotating tiles until the lines connect correctly, then retrieve the glass eye.
- Use the note and symbols to solve the Element Casket Box Puzzle, placing items correctly to unlock the rune stone.
- Navigate the portal puzzle by moving colored pyramids to their designated cells, and then enter the library to collect vital books and items.
Chapter 3: First Brotherhood
This section involves more complex interactions, including dealing with a mine, repairing machinery, and deciphering ancient symbols.
Major Tasks and Puzzles
- Gather the hammer and investigate the rubble near Folly, then use the gunpowder and cord to blow up a blocked passage.
- Solve the Keg of Gunpowder Puzzle by arranging the fuse to ignite the explosives safely.
- Operate the minecart by adjusting the track switches with the arrow controls, ensuring the cart follows the correct path to escape.
- Use the tools to repair the windmill, removing restricted planks, and then activate it to progress further.
- Complete the Chalkboard Puzzle by moving the pieces into the correct positions, which unlocks access to new areas.
Additional Exploration
- Find the castle gate detail on a blanket near the woods and use it to solve the castle gate puzzle by moving the copper bars according to the provided instructions.
- Explore the castle ruins, collect the final puzzle pieces, and use the tools to unlock the portal to the next area.
Advanced Puzzles and Final Challenges
The game culminates in a series of intricate puzzles, including the Tower Steps, Rings, and Crystal Podium puzzles. These require careful observation and strategic movement to unlock the final sequence.
Noteworthy Final Tasks
- Arrange the tower rings into their correct positions to access the dungeon museum.
- Complete the Crystal Podium puzzle by placing the correct crystals in designated positions, guided by clues from the books and statues.
- Use the rune stone and the map to unlock the Canyon and Well Tile puzzles, which unlock secret passages and treasures.
- Finally, assemble the Soul Catcher device by following the instructions in the book, powering up the soul trap to capture the evil entity.
Special Items and Hidden Secrets
Throughout your adventure, you’ll discover hidden objects like the glass prism, embroidery hoop, and various keys necessary for unlocking doors and safes. Pay close attention to details such as symbols, patterns, and clues scattered across the environment.
Utilize different potions, including the Cat’s Intuition and Elephant’s Memory, to reveal hidden items or unlock special mechanisms, ensuring your success in completing the game.
Mastering these puzzles will ultimately help Maaron and Folly restore peace to the land, bringing their quest to a triumphant conclusion.

Alexa Monroe
Alexa Monroe is a US-based gaming journalist and lifelong gamer. She writes about game codes, updates, and hidden secrets that help players get the most from every title. Link x.com Link insta